Coloring Chick Embryos (For Identification, or Easter fun)
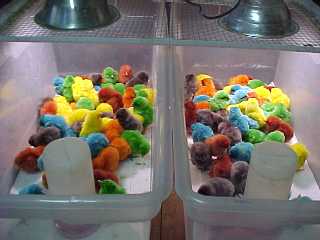
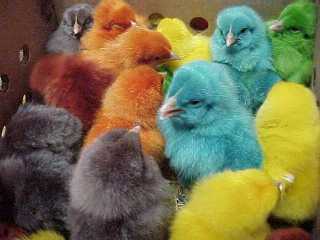
The main purposes in coloring embryos are to provide a practical method of identifying chicks from different groups of eggs and so you can watch their movements after they leave the nest. In wildlife management studies, where identification and observation of ducks are difficult, identification and observation are made easy by coloring the embryos with bright dyes. It can also be used to provide colored Easter chicks for kids. The color is just on their fluff and only lasts a few weeks until their feathers grow in.
Coloring chick embryos provides the practice necessary to become skilled in the coloring technique while acquainting you with the tools and supplies students, researchers, and professional people use.
Equipment and Supplies
- 1 large beaker (1000 ml) or pan
- 2 small beaker (250 ml) or water glass
- 1 hypodermic syringe
- 1 No. 20 gauge hypodermic needle
- 1 No. 3 dental drill or similar drill device
- 1 ounce bottle of tincture of merthiolate
- 1 ounce of paraffin
- 1 small bottle of each dye used in coloring the chicks. Certified food dyes of two to three percent concentration are available in most grocery stores.
- Fertile eggs incubated 16 or 17 days (preferably a "white" breed, which take the color better, such as White Leghorns for egg layers or Cornish Rocks for meat birds)
Procedure
Put water in the large beaker or pan and place it over heat. Loosen tops of bottles containing dye and place them upright in the small beaker or glass. The tops are loosened so the bottles of dye will not explode when heated. Put syringe, needles, and drill in same container with the bottles of dye. Add about an inch and a half of distilled water to the small container, and place in the larger container until the water in the larger container has boiled for 20 minutes. Remove from the heat, pour the water out of the small container, and allow the contents to air dry as they cool.
At a spot about ½ inch from the small end of the egg, daub an area about 1 inch in diameter with merthiolate. Dip the tip of the dental drill in merthiolate. Rotate the drill between your fingers while gently pressing the tip against the shell in the center of the daubed area. Rotate only until you make a hole in the shell.
Assemble the syringe and needle. Be sure they do not become contaminated by contact with foreign objects. Dip the needle in the merthiolate, and withdraw ½ cc. (cubic centimeter) or .5 ml. (milliliter) of dye. Insert only the tip of the needle in the hole and through the shell membranes. To prevent overflow, gently and slowly inject the dye. Remove the needle, seal the hole with paraffin, and return the egg to the incubator. Clean the syringe and needle by flushing them with distilled water each time you use a different color dye.
You can mix dyes to produce colors other than those available at local stores. You can inject them into chicken, duck, goose, and other species of eggs.