Bantam & Gamebird Breeder Cages
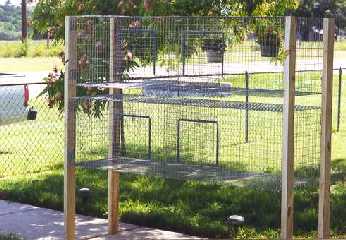
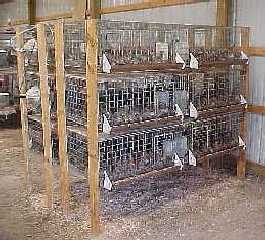
We built cages for our bantam breeders that are 24 inches Deep by 72 inches Wide by 20 inches High. They have a divider in the middle creating two 24"x36" cages. These are stacked two high and supported by pine 2x4 legs (photo 1).
Construction is of 1"x2" - 14 gauge and 1/2"x1" - 16 gauge welded wire both 24" wide, as follows:
cut 3 pieces of 1"x2"x24" welded wire 72" long (front, back and top)
cut 2 pieces of 1"x2"x24" welded wire 20" long (ends)
cut 2 pieces of 1"x2" wire to a size of 13"X14" (doors)
cut 1 piece of 1/2"x1"x24" welded wire 72" long (bottom)
cut 1 piece of 1/2 x1"x24" welded wire 20" long (center divider)
Trim four inches off one side of two of the 24"x72" wire making them 20"x72". These will be the front and back.
Using J-clips spaced 2" apart and j-clip pliers make a U-shape connecting the two end pieces (20"x24") to the front (20"x72") |______| Then attach the back (20"x72") to make a complete rectangle. Lay the top wire on top and connect it all the way around all four sides. Turn the whole thing over so that you now have a welded wire "box" with an open top. Measure 36" from one end and attach the center divider to the front and back. Turn the whole thing over again and connect the center divider to the top. Turn it over one more time and place the 1/2x1x72 bottom wire over the cage and fasten it all the way around and also to the center divider.
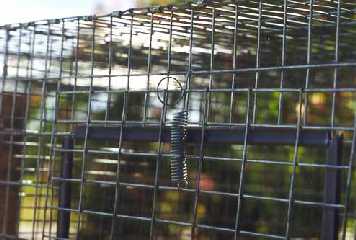
Examine the 20"x72" sides of the cage and determine which is straighter (less bowing caused by the wire being in a tight roll from the factor). This side will be used as the front. Turn the cage so this side is facing up and measure four inches from the bottom and four inches to the left of the center divider. This will be the lower right corner of the left cage door opening. Cut out and remove a square section of the cage 12"Wx13"H. Position one of the 13"x14" precut door pieces so that the 14 inch side is left to right and the bottom lines up with the bottom of the 12"x13" opening. This should leave the door overlapping the opening by 1" on the top and sides with the bottom lined up exactly (photo 6). Using J-clips, fasten the bottom of the door to the bottom of the opening with a clip every four inches and don't clamp them very tight. These will be your hinges (see photo 5 and photo 7 for door hinge detail). You can fabricate some sort of clip to keep the door shut, or order "finger loop springs" that you can attach to the door to clip it shut (photo 6). These cost around 60 cents each.
Then do the same on the opposite side of the divider to put the door in that end of the cage. Positioning the doors toward the center of the cages will leave enough room on the left and right sides to install through-the-cage trough style feeders with those often used for rabbit cages.
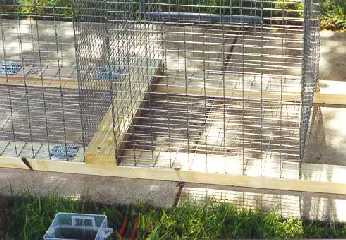
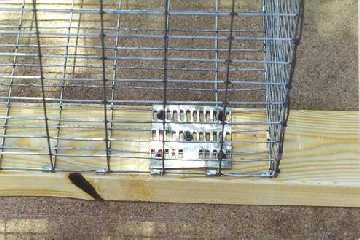
After building two 72" wide double cages in this fashion, I put the legs on them by using galvanized sheet metal splice pieces (photo 2). You should be able to find them at any good hardware store (I got mine at Lowe's). They are about 3x6 inches and are punched to create little spikes all over one side. They are meant to hammer into two pieces of 2x4 lumber end-to-end to splice them together or repair a broken or cracked one. I cut these in half with tin snips and use one 3x3 inch splice piece at each corner of the cage (photo 3).
Lay two 5 or 6 foot 2x4s flat on the ground lengthwise 2ft apart. Stand one of the 24"x72" cages in position on end on the 2x4s (be sure the doors are correctly oriented NOW, BEFORE you hammer them onto the legs :o) . Then open the cage door and reach in and position a 3"x3" galvanized metal splice in each corner of the cage against the 2x4 on the outside of the wire. Hammer the splice plate through the cage wire into the 2x4 (I use a small 2 pound sledge). I also drive wood screws with a cordless drill at each corner through the splice plate into the wood just to make sure it doesn't come apart. It's easy to run the screws through the holes already punched in the splice plate (photo 2).
Then place the second cage on end on the 2x4 legs and use a loose piece of 2x4 to position the top of it about 3.5" below the bottom of the top one and attach it with splice plates and screws as before (photo 4).
Then get help to turn the whole assembly upside down and position and attach the opposite pair of legs on the other end of the cages in the same fashion.
The finished product is VERY sturdy on it's new feet. If I should detect any sagging in the middle of the 6 foot cages, I plan on either placing angle iron or a 2x2 board between the legs so that the cage rests on it for it's length. Using the J clip pliers and J clips 2 inches apart, the cages are VERY sturdy and exhibit no sagging whatsoever so far.
We cut an piece of 1/4" plywood (or old wood paneling) to 71 3/4" x 24" and slide this on top of the bottom cage to catch the droppings from the top cage (photo 7). We pull it out once or twice a week, dump it and use a putty knife to clean off the droppings. Justine also painted the plywood first with clear Polyurethane so we can wash it off with a hose or spray it with disinfectant as needed.
The 1x2 side and top wire is 14 gauge and the bottom 1/2x1 wire is 16 gauge. I got the 1x2 wire at a local hardware store for $59 for a 100' roll, but bought the 1/2x1 (bottom wire) at a feed store and got soaked $125 for that 100' roll, but it should last forever using it only for bottoms and dividers. The clips are about $2.50 a pound (makes about 2-3 cages applied 2" apart. The J clip pliers are about $8 for the cheap pair we have (Little Giant) and $16 for a better pair that we use to tighten the clips after we install them with the cheap pliers.
The cheap pliers get the clip ON quicker and neater, but don't get them tight enough for my liking. It is HELL on the hands! I had blood blisters after my first cage, but my right hand is now one big callous. All these tools are available from numerous sources including Cutler Pheasant Supply. See our Poultry Supplies Help page.
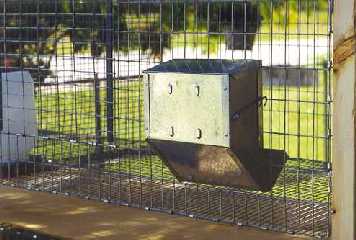
Use "rabbit feeders" with solid bottoms on the bantam cages (photos 5 and 7), but you can also use the slide top style metal or plastic chick feeders inside the cages as well.
The above sized cage works nicely for a pair or trio of bantams. For quail we build cages the same way, but only make them 14" high and we're able to stack three of them on one set of legs (photo 8). The outside quail feeders from GQF work well with this arrangement also. The quail have no trouble getting their heads through the 1"x2" wire to get to the feed. You can also use these hanging feeders as automatic waterers by adding float valves also made by GQF and available from many suppliers. (See our Poultry Supplies Help page).